

Disclosure: Some links on this site are affiliate links. As Amazon Associates, we earn from qualifying purchases (at no cost to you).
Creating a DIY tipi tent for your kids is a fun and rewarding project that can transform their play space into a magical retreat. Whether you’re looking to spark their imagination or simply provide a cozy nook for reading and relaxing, a tipi tent is a perfect addition to any child’s room.
Follow these seven steps to create your own DIY tipi tent.
How To Create A Kids Tipi
Step 1: Gather Your Materials
To start, you’ll need the following materials:
- 6 wooden poles (about 6-7 feet tall)
- Strong rope or twine
- Fabric (canvas or any durable material)
- Scissors
- Measuring tape
- Drill (optional, for added stability)
- Decorative items (fairy lights, cushions, bunting)
Make sure to choose fabric that’s durable and safe for children. Canvas is a popular choice because it’s sturdy and easy to work with. Gather all your materials in one place before you start to ensure the process goes smoothly.
Step 2: Prepare the Wooden Poles
Arrange the six wooden poles in a circle, with the tops of the poles meeting in the center. The base of the poles should form the perimeter of your tipi. If you want a more stable structure, drill small holes through the tops of the poles about 6 inches from the end.

This will allow you to thread the rope through for added security. Preparing the poles correctly ensures that your tipi will be stable and safe for your kids to play in.
Step 3: Secure the Poles
Tie the tops of the poles together using a strong rope or twine. If you’ve drilled holes in the poles, thread the rope through these holes before tying it off. Wrap the rope around the poles several times to ensure they’re securely fastened.

Spread out the poles to form the basic tipi shape, ensuring they are evenly spaced and stable. This step is crucial as it forms the framework for your tipi, so take your time to get it right.
Step 4: Measure and Cut the Fabric
Measure the distance around the base of the tipi and the height from the base to the top. Use these measurements to cut your fabric. You’ll need enough fabric to wrap around the entire structure and overlap slightly at the entrance.

Cut the fabric into a large triangular shape or several smaller panels, depending on your design. Accurate measurements are essential to ensure the fabric fits snugly and securely around the poles.
Step 5: Attach the Fabric to the Poles
Start by attaching the top of the fabric to the poles where they meet. Use strong twine or fabric ties to secure the fabric at the top. Wrap the fabric around the poles, ensuring it is taut and evenly distributed. Secure the fabric to the bottom of the poles using more twine or fabric ties.

If you’re using multiple panels, overlap them slightly to prevent gaps. This step gives your tipi its structure and appearance, so make sure the fabric is attached securely and neatly.
Step 6: Create the Entrance
Decide where you want the entrance to be and cut a slit in the fabric. The entrance should be wide enough for your child to easily get in and out.

You can also add ties to the sides of the entrance to hold the fabric open when needed. Creating a proper entrance not only adds to the functionality but also enhances the aesthetic appeal of the tipi.
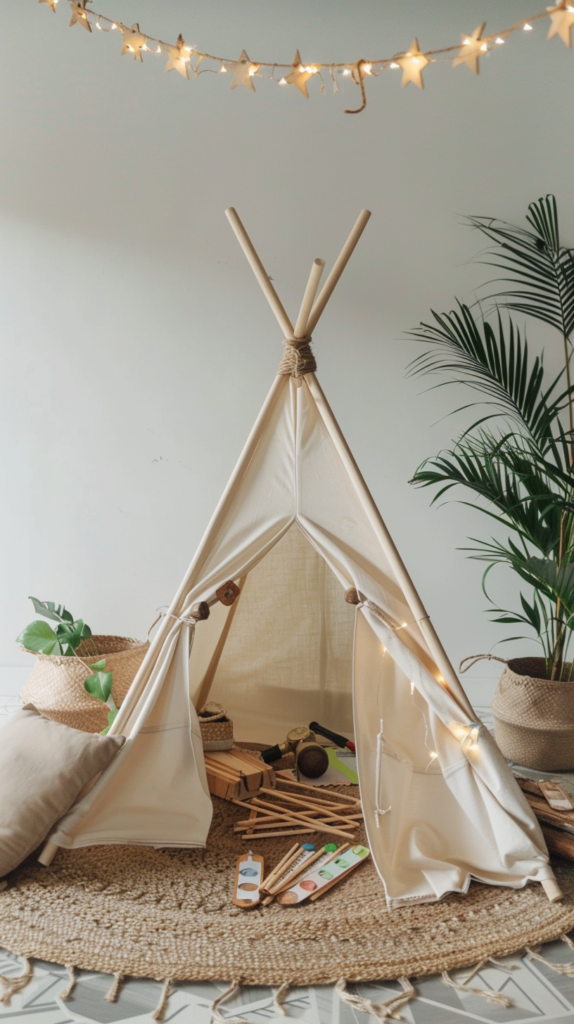
Step 7: Decorate Your Tipi
This is the fun part! Decorate your tipi to match your child’s personality and interests. Add fairy lights for a magical touch, cushions and blankets for coziness, and bunting or other decorations to make it unique.

You can also place a soft rug or play mat inside for extra comfort. Decorating the tipi makes it inviting and special, turning it into a beloved play area for your child.
FAQ
Q: What type of fabric is best for a DIY tipi? A: Canvas is an excellent choice because it’s durable and easy to work with. Other options include heavy cotton or outdoor fabric, which can withstand wear and tear and provide a sturdy structure.
Q: How can I ensure the tipi is stable? A: Securing the poles properly is key. Make sure they are evenly spaced and tied tightly at the top. Drilling holes and threading the rope through them can add extra stability. Ensure the fabric is also tightly secured to the poles to prevent slipping.
Q: Can I use a tipi outdoors? A: Yes, you can use a tipi outdoors if you choose weather-resistant materials. Outdoor fabrics and treated wood poles are suitable for outdoor use. However, remember to bring the tipi inside during harsh weather conditions to prolong its lifespan.
Q: How can I make the tipi more comfortable? A: Add plenty of cushions, blankets, and a soft rug or play mat inside. This not only makes the tipi more comfortable but also creates a cozy, inviting space for your child to relax and play.
Q: Is it safe for young children? A: Yes, a tipi can be safe for young children if properly constructed. Ensure all materials are non-toxic and securely fastened. Regularly check the stability of the structure and avoid placing the tipi near hazards.
Q: How can I personalize the tipi? A: Decorate it with items that reflect your child’s interests. Use themed cushions, fairy lights, bunting, and other decorations. You can also let your child help with the decoration to make it even more special.
Final Thoughts
Building a DIY tipi tent is a wonderful way to create a special space for your child. It’s a project that combines creativity, functionality, and a bit of DIY spirit. With careful planning and execution, you can create a tipi that is both beautiful and durable.

From gathering materials to adding the final decorative touches, each step is an opportunity to customize the tipi to suit your child’s needs and preferences.
A tipi tent can provide endless hours of imaginative play, reading, and relaxation. It’s a versatile addition to any child’s room, fitting seamlessly into a variety of decor styles. Whether you choose a simple, natural design or a vibrant, themed creation, the result will be a cherished space for your child.
Embrace the DIY process and enjoy the journey of creating something special for your little one. Happy crafting!